Code Fundamentals Part II Lab
Part 1 - Create an HTML file
1. Let’s get started by opening up the index.html file in our code editor and setting up a few pieces that we’ll want for our game.
The code we’ve written executes immediately as it is encountered in the page. For simple code like this, that’s fine, but for more complex code we’ll be encountering, we’ll want to postpone execution until the page and any linked resources or scripts have loaded.
2. Let’s define a startup function called “startCanvasApp”. A function is a block of code (starting and ending with braces) that can be executed (“called”) from another place. Let’s make the function execute a log statement to know when it’s called.

|
function startCanvasApp() { console.log("Game started"); } |
3. From your Javascript console, you can manually execute Javascript statements. Try executing this function manually by typing the Javascript command followed by ENTER to make sure it will work:

|
Here you can see that it executes our function, logs the message, and returns. The “undefined” signifies that no value was returned from the function.
4. We don’t want to have to manually start our game from the console though, so let’s add an event listener that will run our start command when the page has finished loading:

|
window.addEventListener("load", startCanvasApp); |
This will make the “startCanvasApp” function be called when the window’s “load” event occurs. If you reload the page now, the function should be called automatically when the page is done loading.
Part 2- Adding The Game Code File
5. Now that our game starts automatically, let’s add some actual game content. For this lab, we’re going to implement a simple game of guessing a number that the computer chooses. To make sure our code stays organized, let’s create this content in a separate file.
Create a file called “game.js” in the same folder as “index.html”. Make sure like you did with the HTML file that the file extension is simply “.js”, as this allows the browser to know that this file is Javascript code.
6. Inside your newly created file let’s make another function that will be run when our game starts. Let’s call it “numberGame” and include another console print to know when it’s called:

|
function numberGame() { console.log("Number game has begun"); } |
7. If you reload your page, the function won’t be called since we haven’t said for the function to be executed from our main function yet.
Within “startCanvasApp”, add a statement to execute our new function:
 |
numberGame(); |
8. Try reloading the page again. It still didn’t execute, but now there’s an error that is displayed in the console:
 |
If you click the link on the right, it will jump to the spot in the code where the error occurred:
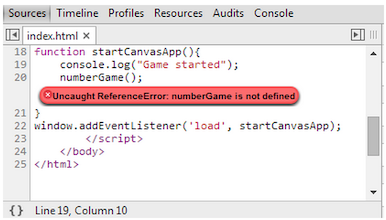 |
9. So what’s wrong? The issue here is that the HTML file doesn’t know to look in our “game.js” file for that extra piece of code. We can fix that by adding a link to the script in the HTML header (as a child tag of the “head” tag):
 |
<script src="game.js"></script> |
Part 3- Creating the Random Number Generator
10. To create our number game, we’ll want to pick a number at random that will be guessed. The function “Math.random()” will pick a random decimal number between 0 and 0.9999…. There are actually, many math-related functions that start with “Math.”, such as sine (sin), cosine (cos), tangent (tan) trigonometric functions, or constants like PI (3.14159…) or SQRT2 (square root of 2). Let’s create our answer and assign it to a variable that we can check later. For testing purposes, we’ll also print it out.
 |
var answer = Math.random(); console.log(answer); |
11. So how can we pick an integer between 1 and 100 using a random value between 0 and 1? If we multiply that value by 99, it will then be a random value between 0 and 99. If we then add 1 to it, the value will be between 1 and 100.
 |
var answer = Math.random() * 99 + 1; |
12. If you run the code now, you’ll see we’re still not getting the values we’d like. The values we have are still decimal values, and I doubt that someone will be able to easily guess a value such as 37.36746…. To fix this let’s run our number through another Math function: Math.floor(). This function, unlike random and the functions we’ve created thus far, requires a value to be passed to it as a parameter and it returns the integer portion of the number (chopping off everything after the decimal place), effectively rounding the number down. There are similar functions for rounding up (ceiling) and to the nearest integer (round).
 |
var answer = Math.floor(Math.random() * 99 + 1); |
Part 4- Collecting and Comparing Player Guesses
13. Now that we have the number we want the player to guess, let’s allow the player to make a guess. There are many ways we could do this, such as having an HTML input tag that they enter in, but for simplicity, let’s get the user’s guess via the Javascript function prompt.
The function prompt takes a string parameter that will be displayed to the user and returns the value that the user enters (or the null value constant if the user cancels the operation instead. Let’s prompt the user to guess a number and assign the user’s response to another variable. Then let’s print out the value they guessed.
 |
var guess = prompt("Guess a number between 1 and 100"); console.log("You guessed " + guess); |
Note: Strings require either single or double matching quotes around them, and if you want a quote to be inside the string you must “escape” it by putting a backslash before it. You can append (join) strings and other variables by use of the “+” operator.
14. If you run your game now, you should be prompted for a guess:
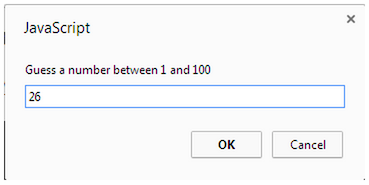 |
15. Next we need to compare the user’s guess and the answer. For this we use “if” statements. If statements evaluate if a condition is true or false, and based on that evaluation executes or skips a block of code.
Let’s start by checking if the value is correct. A single equals sign will assign a value to a variable; a double equals sign tests if two items are the same value:
 |
if (guess == answer) console.log("You win!"); |
16. Try your game again, guessing the correct value and guessing incorrectly:
 |
17. Let’s add if statements to print out if the value was too high or too low. An “if” statement can be joined with and “else” or and “else if” statement, such that if the first statement isn’t true, the “else if” statement will be checked, and if that is also false, the “else” statement is evaluated. This technique is called and “if-else” ladder since you can chain together as many “else if’s” as you’d like to test many conditions.
 |
if (guess > answer) console.log(guess + " is too high!"); else if (guess < answer) console.log(guess + " is too low!"); else |
Note: if statements can be more complex by joining together multiple expressions. For example: if you wanted to test that the guess was between 1 and 100 you could write the following:
 |
- “!” stands for NOT, which flips true to false and false to true.
- “&&” stands for AND and is only true if both expressions to the left and right are true.
- “||” stands for OR and is only true if at least one of the expressions to the left and right are true.
- “>=” denotes “greater than or equals”
- “<=” denotes “less than or equals”
18. Test this out for a few guesses:
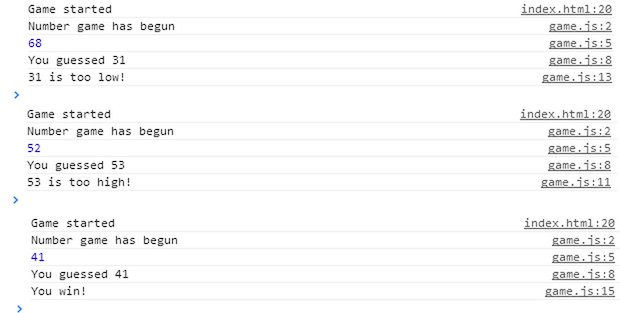 |
19. Looking good so far, but what about entering in something other than a number?
 |
Looks like we’ll have to change that last “else” to an “else if (guess == answer)”. That’s because a string like “hello” isn’t greater than or less than a number like 85, but it’s also not equal, so we need to check that case.
 |
else if (guess == answer) |
Part 5- Making Multiple Guesses and Code Organization
20. Now that the player can guess a number and get feedback, we want to allow them to make multiple guesses until they either get it correct or give up. To keep things organized, let’s separate this logic into separate functions.
Create another function called “processGuess” that takes two parameters: the player’s guess and correct answer, and move most of your code there. This function will process a player’s guess and determine if it’s correct. Note that the names of the parameters can be different than what they are called in the calling function.
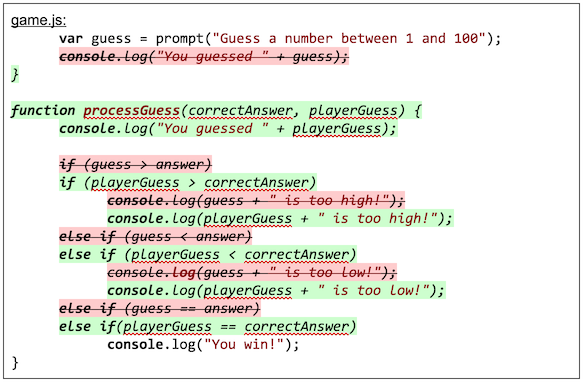 |
} function processGuess(correctAnswer, playerGuess) { console.log("You guessed " + playerGuess); if (playerGuess > correctAnswer) console.log(playerGuess + " is too high!"); else if (playerGuess < correctAnswer) console.log(playerGuess + " is too low!"); else if(playerGuess == correctAnswer) |
21. Update your “numberGame” function so that it calls this new function:
 |
processGuess(answer, guess); |
22. See how when “processGuess” is called, local variable “correctAnswer” gets assigned to the caller’s “answer” variable and “playerGuess” gets assigned to “guess”.
We’ll need to have the processGuess function return a whether or not the user guessed correctly so that our numberGame function will know when to stop prompting for guesses. Modify the last portion of the function to:
 |
else if(playerGuess == correctAnswer) { console.log("You win!"); return true; } return false; |
Note: curly braces around the two statements. In order to group multiple statements together to be executed or skipped in response to an if statement or a loop, you must wrap them with curly braces. This is optional for single statements.
This should cause true or false values to be returned to the calling context, which we can then assign to a variable we’ll call “done”, indicating whether or not we’re done:
 |
var done = processGuess(answer, guess); |
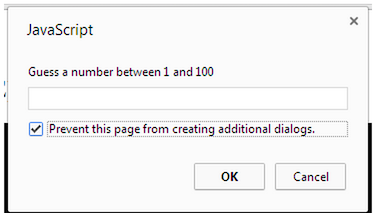
23. Before we get to loops, a brief warning: if your code gets stuck in an infinite loop, it’s best to close the browser tab and reopen it after you’ve fixed your code. If popups like (“prompt”) prevents you from closing the tab, you must click the checkbox that prevents any dialogs from popping up first before closing the tab:
 |
24. Now on to loops. There are a few ways in Javascript you can loop, primarily “for” and “while”. “For” is commonly used for looping over a range of values. For instance, for(var i=1; i<=10; i=i+1) console.log(i); will print out the values from 1 to 10 by creating a variable “i”, assigning it to 1, adding 1 to it every iteration of the loop, and only stopping when “i” no longer is less than or equal to 10.
 |
var done = false; while(!done) { var guess = prompt("Guess a number between 1 and 100"); done = processGuess(answer, guess); } |
Part 6- Allowing the Player to Quit and Debugging Code in the Browser
25. You should have a functional game now, but let’s add one final piece. We want to allow the player to quit our game before winning. We can check the user’s input to see if it’s the constant “null” and exit the loop immediately using the keyword “break”.
 |
if(guess == null) break; |
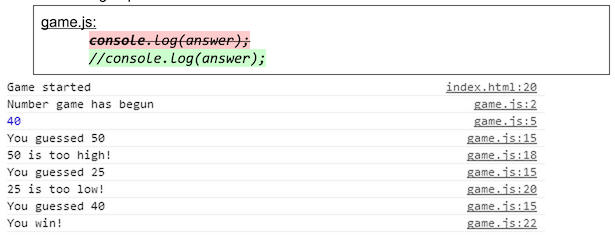
26. Try your game out now. You should be able to play a complete game. For an added challenge you can comment out (add a “//” at the beginning of the line) or remove the console log to print the correct answer:
 |
//console.log(answer); |
27. Before concluding this lab, let’s wrap up with one last essential for programming with Javascript: the debugger. So far we’ve been able to print out values to the console, which can be helpful to track down how the code is working, but the in browser debugger provides a much more powerful and flexible method of seeing how the code is working. As the name implies, it is extremely useful in de-bugging the code (finding and fixing/removing errors (“bugs”) in your code).
To start using the debugger, switch to the “Sources” tab in your console view. Here, you’ll see a list of all the files that are being included in your project on the left. You can open and view them in the middle section of the screen. We’ll get to the right side of the screen in a moment.
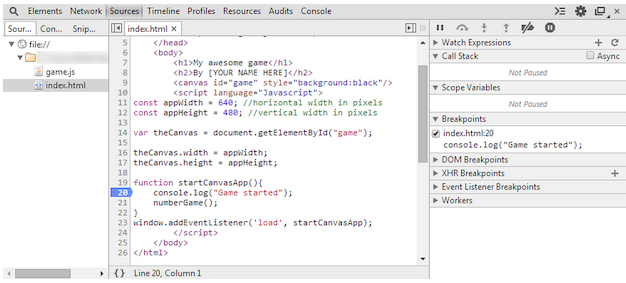 |
29. Find the start of your startCanvasApp() function, and click the line number next to the first statement of the function. This sets a “breakpoint” (clicking the line number again will erase the breakpoint). Reload your page to see what this does.
First you’ll notice that your game pauses when it encounters a breakpoint, and the screen has the following overlay:
 |
If you click the first button (Play/pause) it will resume your game (until the next your code tries to execute the another statement that is marked as a breakpoint). If, instead, you click the second button (Step Over), you’ll notice in your code preview that a single line of code is executed (check the Console for your log statement) and the program proceeds to the next line.
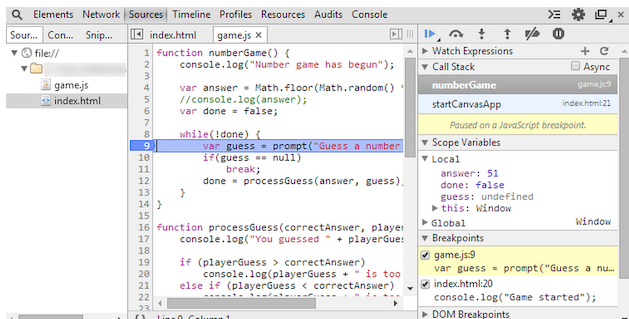
30. These two buttons are repeated in the right debugger panel, as well as a few others. Try adding a second breakpoint on the line where you guess a number and hit “Play/pause”. You should see that the code runs up to and stops on this breakpoint:
 |
31. Try pressing the “Step over” button  several times to see the code be executed in the loop we’ve set up. Notice that “Step over” doesn’t go line by line through our “processGuess” function, but instead executes it completely before pausing again.
32. Now try using the “Step into” button  several times. You should notice that this will pause after each line of every function and subfunction.
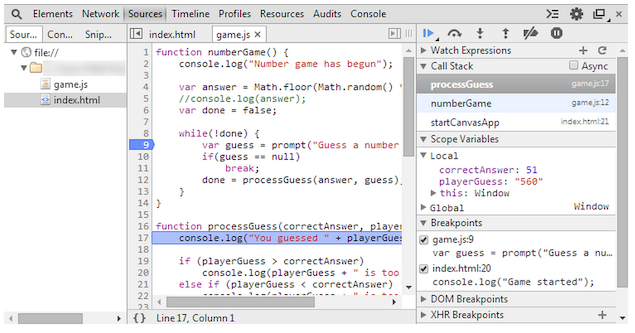 |
33. Notice that at the top of the right panel, it displays the “call stack”. This is a history of sorts that shows the context of where the code is being executed from. In this case, “processGuess” was called by “numberGame”, which was called by “startCanvasApp”. It also displays the filename and line number of the function calls that you can click on to jump to view that code context.
34. Now try using the “Step return” button  This will resume execution until the current function returns to its parent caller.
35. One final thing about debugging: notice in the right panel, we can see all the variables that are active for the current function context (You can also hover the mouse over a variable to view its current value). There can be global variables that will always be displayed too, but local variables are only visible within the context of an executing function.
You can double-click any of these variables in the right panel to change the value. Try “cheating” by changing the correct answer or your guess to a different number, then resume the game and see how the game plays out.