Game Loop and Game State Engine Lab
Part 1 - Start Animating
1. We will begin with the fish that we drew last time. You can start with the provided code base, or you can modify your previous lab to remove the speech bubble(s) and the multiple fish, leaving a single stationary fish.
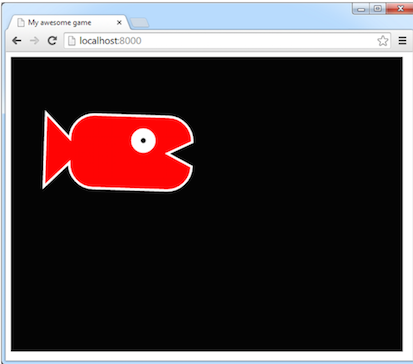
2. We’d like to make the fish be able to swim across the screen. In order to do so, we’d like to have a variable hold the fish’s position, update it each frame, and then redraw the fish. Try using the following code in your “startCanvasApp” function:

|
var x = 175; while(true) { x += 1; drawFish("red", x, 175, 0.8, Math.PI*0.01); } |
You’ll notice that the fish doesn’t move and the browser may lock up or fail to finish loading the page. The issue here is that the browser will only redisplay the canvas (and any other page content) when a script is not actively running. At first you might consider this an inconvenience, but consider what your screen would look like if it displayed your scene every intermediate step of the way: you’d see background objects flickering since they would be drawn on top and only fractions of a second later would they be drawn over by foreground objects.
|
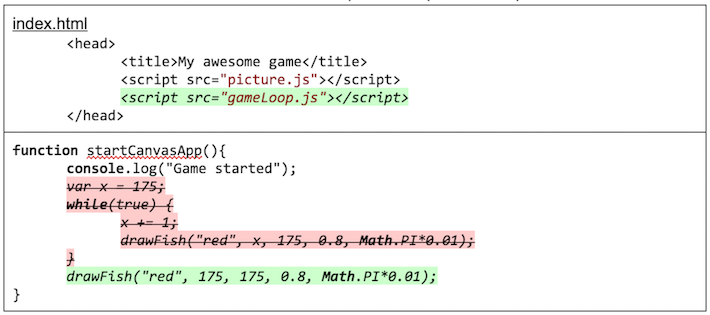
<script src="gameLoop.js"></script> drawFish("red", 175, 175, 0.8, Math.PI*0.01); |
4. Inside “gameLoop.js” create a function that will handle our game logic every frame. You can move our fish drawing inside here and add a console log statement so we know that the function is being called.

|
var frame = 0; function runGame(){ frame++; console.log(frame); drawFish("red", 175, 175, 0.8, Math.PI*0.01); } |
Also add a call to this new function from your startup function in “index.html”:

|
runGame(); |
5. If you run now, only the first frame will be drawn (and the frame number printed only once). Add the following to the top of “runGame” make the “runGame” function get called every frame:

|
requestAnimationFrame(runGame); |
You should now see the frame counter repeatedly printed to the console.
6. Time to get that fish moving! Browsers use a standard framerate of 60 frames per second. Let’s change your frame counter to update the x position of the fish 300 pixels to the right per second (5 pixels per frame):

|
var x = 175; function runGame(){ requestAnimationFrame(runGame); x+=300*(1/60); console.log(x); drawFish("red", x, 175, 0.8, Math.PI*0.01); } |
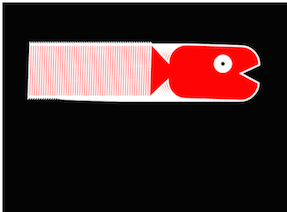
7. Run your game. You should see the fish start to move, but it’s leaving a streak behind it:
|
This is due to the fact that we never clear the canvas between frames. Instead, we just keep drawing new fish on top of the current image every frame.
Part 2- Fixing Issues
8. As you saw in the last step there is a image streak issue. To fix this problem, we should erase the contents of the canvas as you draw each image. The simplest way to do so is the clearRect command. This draws a rectangle similar to fillRect, only instead of using a fill color, it uses a special “erase” color, returning the canvas back to its original background color. Clear the canvas’ entire drawing area by drawing the erase rectangle over the entire canvas (top left at (0,0) with width and height the size of the canvas):

|
context.clearRect(0,0, appWidth, appHeight); |
Make sure to put this before your other drawing commands; otherwise, you’ll erase what you want to be displayed.
As an aside, you can make a fake motion blur effect by drawing a partially transparent rectangle that is the background color over the scene instead. This is what the screenshots of this lab use to portray the sense of motion.

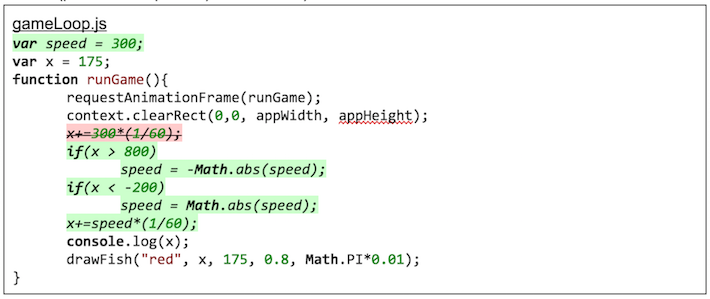
9. The fish moves off the screen too quickly, so let’s have it swim back and forth when it goes off the edge of the screen. Create a variable (outside the function) that holds the fish’s current speed and if the fish goes off one side or the other, we’ll update the speed to the positive or negative version of that speed (Math.abs gets the absolute value (positive component) of a number):
|
var speed = 300; var x = 175; function runGame(){ requestAnimationFrame(runGame); context.clearRect(0,0, appWidth, appHeight); if(x > 800) speed = -Math.abs(speed); if(x < -200) speed = Math.abs(speed); x+=speed*(1/60); console.log(x); drawFish("red", x, 175, 0.8, Math.PI*0.01); } |
10. The fish is moving correctly but we don’t want it swimming backwards when going left, so let’s make the fish draw flipped horizontally when swimming left. Edit “picture.js” to replace the scale parameter with separate scales in the X and Y direction:
 |
function drawFish(fishColor, x, y, scaleX, scaleY, angle) { context.save(); context.translate(x-250,y-200); context.translate(250,200); context.rotate(angle); context.scale(scaleX,scaleY); context.translate(-250,-200); |
Then update your fish instance to use a positive X scale when the speed is positive and a negative X scale otherwise:
 |
drawFish("red", x, 175, (speed>0)?0.8:-0.8, 0.8, Math.PI*0.01); |
Note: the syntax expression?value1:value2 is called a “ternary operator” and is shorthand for: if the expression is true, use value 1; otherwise, use value 2.
Your fish should now swim properly to the left.

Part 3- Smooth Animations
11. Remember how requestAnimationFrame is only called when the browser says it should redraw the page? The browser is smart enough that if you switch to a different tab, your game will automatically pause and your animation function will not be called (for efficiency - nothing will be seen, so why chew up more CPU than necessary?). Try loading your page and quickly switching to a different tab in the same window then switching back after a little while. You should see that the fish stops moving when the page isn’t active (when resuming the tab, the fish is in the same position you left it).
12. Your fish should be swimming fairly smoothly right now, but not as smoothly as it could be. Consider if your game had a lot of complex logic or math it had to perform, but only at irregular intervals. For example, an enemy guard is idle and suddenly is woken and needs to compute his route to where an alarm was triggered using some complex algorithm. To simulate your game being under heavy load at random times, let’s make the computer count to a large number really fast but only on 50% of the frames (increase the “large number” of the for loop until you can notice an effect):
 |
if(Math.random()>0.5) { for(var i=0; i<100000000; i++){} } |
Note: don’t ever actually do this in a real game. This is called a “busy loop” that chews up CPU power to do nothing but wait. Also, the time that is delayed will vary based on the processing power of the computer it is run on. There are better mechanisms that allow the CPU to “sleep” and resume functionality at a later point in time, allowing other processes to run.
Compare this stuttering with the smooth animation that doesn’t contain this artificial delay. You’ll notice that when the game is overloaded, time slows down to make sure the game keeps up.
13. There’s a way to fix this problem. We can compute the time between adjacent frames and scale how much we want to move the fish based on this. To get the current time (calculated as the number of milliseconds since the page has loaded), create we can use the function performance.now.
To calculate the time between the current frame and the last frame we’ll need to save off the last frame time to a variable. The variable should be declared outside the function so that it continues to exist after the function has finished an execution. We can then compute the difference and set the current frame time to be the next frame’s “last time”. We then divide this difference so that “deltaTime” is in seconds instead of milliseconds. Note that we also initialize the last frame time so that the first frame has a valid reference point from which to subtract.
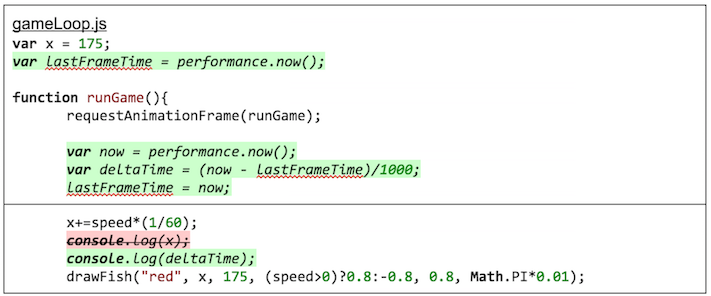 |
var lastFrameTime=performance.now(); function runGame() { requestAnimationFrame(runGame); varnow=performance.now(); vardeltaTime=(now-lastFrameTime)/1000; lastFrameTime=now; x+=speed*(1/60); console.log(deltaTime); |
14. You should see the values of deltaTime printed right now, you should get values around 1617 milliseconds (when the artificial delay isn’t present). This is because, as mentioned earlier, web browsers try to target a framerate of about 60 frames per second, which means 16.666... milliseconds (1/60 second) per frame on average. But since our game doesn’t run at a consistent framerate, let’s base our movement by how much time has actually elapsed:
 |
x+=speed*deltaTime; |
Notice how when we introduce the artificial delay the fish moves at the rate we’d expect it to, even though frames are “dropped” in between.

15. This variable framerate compensation works well for minor delays, but what about large delays? Recall how frames are only drawn when the browser tab is visible and not when it’s hidden behind other tabs. Try loading your page again and quickly switching to another tab and then a little while later switching back.
Why didn’t the fish stay put this time? Our variable framerate calculated a large time difference between the last frame before switching tabs and the first frame after switching back, resulting in all the frames in between being “dropped”. When the game resumed the fish moved a large amount in its current direction, bypassing our “turn around” boundaries. In a simple game like this, it’s a minor annoyance, but consider the bad effects this could have on more complex games. For example, a player is moving forward and needs a key to get through a door but glitches the game so that they keep moving forward longer than expected and bypass the door completely, ruining the puzzle.
Part 4- Fixing the Frame Rate
16. Once again, there’s a way to fix this. We’ll have to compromise between the variable framerate of the actual time elapsed and the fixed timestep per frame that assumes 1/60 of a second has passed. Let’s continue using the elapsed time but cap it at a maximum so that not too much time can elapse between frames. This will cause the game to slow down rather than drop frames when too much time has elapsed but still drop frames rather than slow down if the delays are minor.
Update your “deltaTime” calculation with this:
 |
vardeltaTime=Math.min((now-lastFrameTime)/1000,1/20); |
Here we grab the lesser of the difference and 1/20th second so that if the difference is more than 1/20th second the value is limited. In effect, this defines a minimum framerate of 20 frames per second by limiting “deltaTime” to a known maximum duration of 1/20th of a second.
17. A side benefit of having a “deltaTime” variable is that we can multiply this value if desired to get get slowmotion or turbospeed effects in our game. Remove the artificial delay (“busy loop”) and experimenting multiplying deltaTime by different values to slow or speed up the animation (try multiplying by 0.5 for 50% (half) speed and 2 for 200% (double) speed).
 |
deltaTime*=1.0; |
18. We’ll want to add more than just this one animation. But before moving further, we should do a bit of cleanup to our code. A good practice is to make code modules reusable. This way you can simply copy/paste or reuse whole files without having to modify them to work in a different game. Let’s separate our timing section from the fish operations so that the runGamefunction can be more easily reused in other games we might make:
 |
animateFish(deltaTime); } function animateFish(deltaTime) { |
19. Let’s split up our fish function one step further. It’s good to separate out logic (how things are updated and interact) from how they are displayed. This will allow us to update the logic of all items in a scene before displaying them. While we only have a single object in the scene right now, it’s a good idea to plan ahead. Consider what would happen if a player kills another player during a frame, but we the order we updated and drew things was: update and draw the first (alive) then update and draw the second (which kills first). On this frame the first player should have been displayed dead, but we already drew it so it displays alive. If, instead, we update both players first before drawing anything, then we can draw a consistent scene with the one player properly dead. So split our animation into 2 functions:
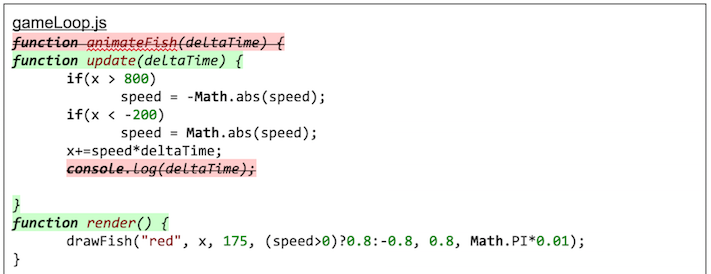 |
function update(deltaTime){ } function render(){ |
Make sure to update your function calls too:
 |
update(deltaTime); render(); |
Part 5- Multiple Animations
20. To support multiple animations, we will be building a “state machine” next. State machines provide the ability to track multiple game “states” that have different behaviour (such as being on the title screen, playing a level, viewing high scores) and transition among them. Our master game loop will keep track of which state we are in and call the appropriate update and render functions while the individual states will handle when the game will transition to a different state. Let’s define variables that will hold which game state we currently are in as well as the list of possible states:
 |
var currentGameState; var gameStates=[]; |
21. To allow more reuse, move the fish update and render functions (as well as variables “x” and “speed”) into a separate file “states.js”, which will hold all the states applicable to our game. Make sure to add the appropriate script tag in “index.html” to point to the new JS file.
 |
|
 |
var speed=300; var x=175; function update(deltaTime){ if(x>800) speed=-Math.abs(speed); if(x<-200) speed=Math.abs(speed); x+=speed*deltaTime; } functionrender(){ drawFish("red",x,175,(speed>0)?0.8:-0.8,0.8,Math.PI*0.01); } |
remove the following red highlighted code from the gameLoop.js file:
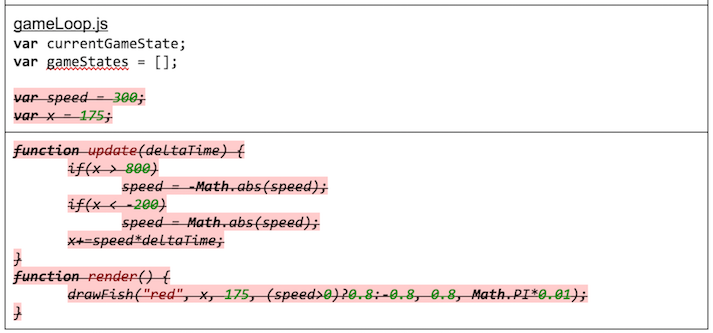 |
22. Now to define our first state: in your “states.js” file, restructure your functions in the following format:
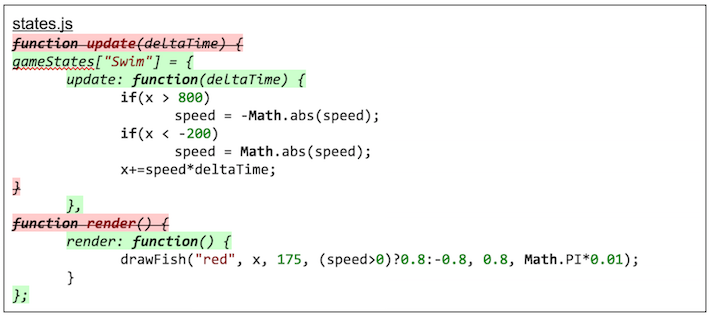 |
gameStates["Swim"]={ update:function(deltaTime){ if(x>800) speed=-Math.abs(speed); if(x<-200) speed=Math.abs(speed); x+=speed*deltaTime; }, render:function(){ drawFish("red",x,175,(speed>0)?0.8:-0.8,0.8,Math.PI*0.01); } }; |
The square brackets (“[“ / “]”) denote indexing into a list (known as an array). The curly braces (“{“ / “}”) define an object that has member variables. In this case we define member variables called “update” and “render”, assigning them to the functions we previously used. To call these functions from our game loop, update your code to call:
 |
gameStates["Swim"].update(deltaTime); gameStates["Swim"].render(); |
This syntax finds the element in the list (array) “gameStates” that has the index of “Swim” and grabs the members “update” and “render” using the dot (“.”) operator.
Part 6- Adding a Game State
23. To see our state machine in action, we’ll need a second state. Let’s make a title screen with a spinning fish:
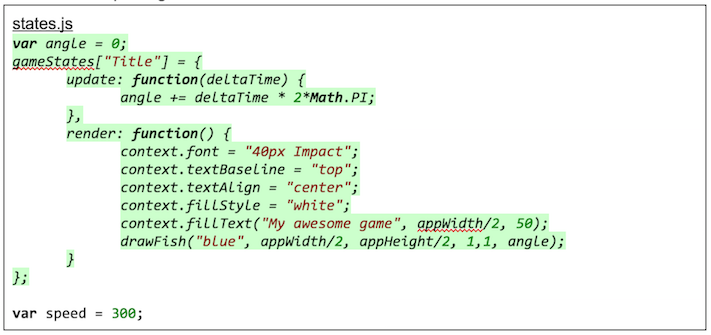 |
var angle=0; gameStates["Title"]={ update:function(deltaTime){ angle+=deltaTime*2*Math.PI; }, render:function(){ context.font="40pxImpact"; context.textBaseline="top"; context.textAlign="center"; context.fillStyle="white"; context.fillText("My awesome game",appWidth/2,50); drawFish("blue",appWidth/2,appHeight/2,1,1,angle); } }; |
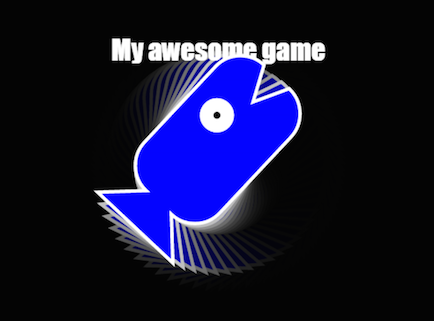
This title screen will display some title text and a blue fish that spins at 360 degrees (2π radians) per second.
24. Change your game loop state references to point to use “Title” instead of “Swim” and you should see the alternative scene be displayed:

|
gameStates["Title"].update(deltaTime); gameStates["Title"].render(); |
25. Now that we have multiple states, let’s try switching between them. Update your game loop to use the variable we defined called “currentGameState”:
 |
currentGameState.update(deltaTime); currentGameState.render(); |
Then add a transition in the title’s update function so that the current game state switches to “Swim” after 5 seconds. Create a variable at the top of your file called “time”, initializing it to 0. Then increment “time” by how much time elapses each frame (“deltaTime”) and transition when “time” passes 5:
 |
var angle=0; var time=0; gameStates["Title"]={ update:function(deltaTime){ angle+=deltaTime*2*Math.PI; time+=deltaTime; if(time>5) currentGameState=gameStates["Swim"]; }, |
Lastly, make sure to initialize “currentGameState” to the first state we want, preferably inside your “startCanvasApp” function on startup:
 |
currentGameState=gameStates["Title"]; |
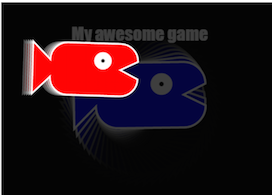
Running your game should now show your title screen for 5 revolutions then switch to the swimming animation.
|
Part 7- Transitioning States
26. Let’s now make the game transition back to the first state after the fish has been swimming for 10 seconds:
 |
time+=deltaTime; if(time>10) currentGameState=gameStates["Title"]; |
If you run your game now, the blue fish spins for 5 seconds then the red fish swims for another 5 seconds. But then the screen starts flickering and displaying both at the same time (sort of):
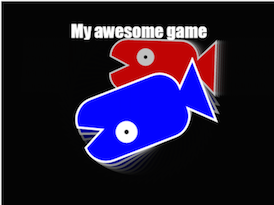
27. What’s happening here? The issue is that we never reset our time variable (nor “angle” and “x”/”speed” variables), so when we transition back to the title state, the time has already expired, so we immediately transition back to the swim state. In the swim state, the time is still expired, so we transition back to the title state. And so every frame we are repeatedly swapping back and forth between our two states.
To fix this, add an initialization function to each state called “init” that will initialize the variables needed for that state (you can also remove the starting values from these variables where they are declared):
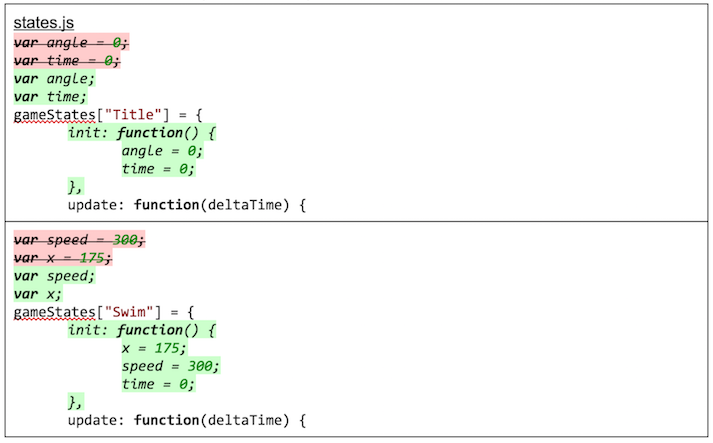 |
var angle; var time; gameStates["Title"]={ init: function(){ angle=0; time=0; }, update:function(deltaTime){ var speed; var x; gameStates["Swim"]={ init:function(){ x=175; speed=300; time=0; }, update:function(deltaTime){ |
28. We’ll want to call the initialization function of a state whenever we transition to it. We can’t place it inside the “runGame” loop since we don’t want variables to be reset every frame. To prevent having to manually call the init function whenever we have a transition, let’s make a function that sets our current game state and calls the initialization function. While we’re at it we can add error checking to the function to make sure we don’t transition to a state that doesn’t exist.
 |
function switchGameState(newState){ console.log("Changinggamestateto"+newState); if(!gameStates[newState]) console.log("Unknowngamestate"+newState); else currentGameState=gameStates[newState]; currentGameState.init(); } |
Make sure to update all your references to switching game states to use this function:
 |
switchGameState("Title"); |
 |
if(time>5) switchGameState("Swim"); if(time>10) switchGameState("Title"); |
Your game should now be switching back and forth between states smoothly.