Controls Lab
1. Our starting point is where we left off: a spinning fish title screen and another state that has the fish swimming back and forth:
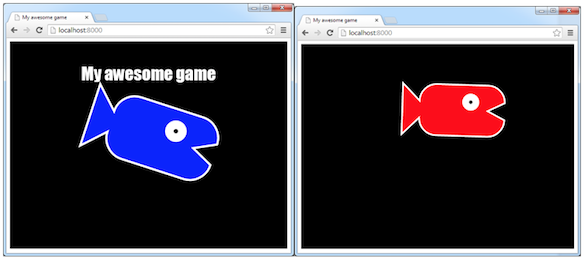
NOTE: The two states should automatically switch back and forth based on a timer.
2. Let’s begin by creating a new JavaScript file that will handle our player inputs (controls). Name it “controls.js” and add the respective script tag to your index file:

|
<script src="controls.js"></script> |

Create new empty file and save it as 'controls.js'.
3. In order to listen for keyboard or mouse events, we’ll need to execute some code when the game starts. So create a function called “registerControls” in your new file and add a call to it from your “startCanvasApp” function in your index file:

|
//register keyboard/mouse listeners |

|
registerControls(); |
4. Event listeners are functions that you can attach to objects on a webpage that will cause the function to be called when a specified event occurs on that object. The general syntax for registering an event listener is: myObject.addEventListener("eventName", function(event) { YOUR_CODE_HERE } ); An alternate syntax is (notice the “on” prefix of the event name): myObject.onEventName = function(event) { YOUR_CODE_HERE }; In our case, we’ll be adding event listeners to our canvas object (theCanvas). For a complete list of events that a browser supports this link: http://www.w3schools.com/jsref/dom_obj_event.asp We’ll start with keyboard inputs and then move to mouse inputs in the second half of this lab.
5. The keyboard events we’ll be using are “keydown” and “keyup”. These events require the object that the event will go to to be active, or “focused”. Consider a webpage that has multiple fields of a form that you have to fill out, such as username and password. Depending on which textbox is selected, the keyboard event of the user pressing a key will only go to one of those fields, not to both fields. Canvas tags, by default, are not able to be focused. We could attach our keyboard events to the web page document root, but if in the future we were to have other text boxes or other elements that wanted keyboard input, this would mean that keystrokes would go only to the game, or possibly both the game and the other elements. Instead, we can make the canvas be focusable by adding a “tabindex” number to the canvas tag element:

|
<canvas id="canvas" style="background:black" tabindex="1"/> |
The “tabindex” attribute specifies an ascending order of objects that can be focused. Consider again a form that you were to fill out online: the “tabindex” attribute of each field specifies the order that, if you were to hit your Tab key, it would advance to the next field.
6. Let’s add a keyboard event listener for when a key is pressed:

|
theCanvas.addEventListener("keydown", |
7. You’ll notice that if you press keys, nothing appears to happen. As mentioned before, keyboard events require an object to have focus. If you click on the canvas, you should see “key down” messages being printed. Clicking outside the canvas causes the canvas to lose focus, resulting in the “key down” messages to stop again. So that our game starts with focus add a line to “focus” the canvas at the top of your “registerControls” function:

|
theCanvas.focus(); |
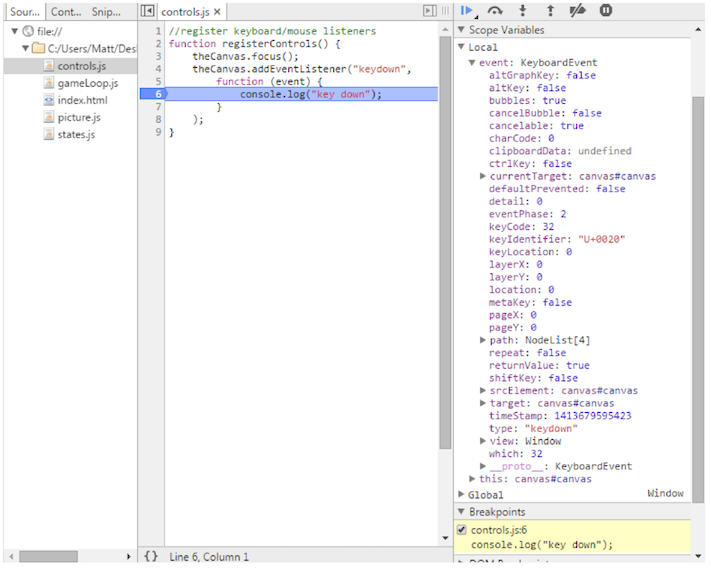
8. Now that we can detect when a key is pressed, let’s determine which key it was. The event object that gets passed our event listener function contains the information we’ll need. Place a breakpoint in the debugger for when the event listener function is called and type a key (such as “space”) to execute the event listener so we can examine what the contents of the event the listener received (alternatively, you can print the event contents to the console and examine them there).
|
9. You’ll notice among the event’s data, there are variables such as “altKey”, “ctrlKey” and “shiftKey” for whether or not the Alt, Ctrl or Shift keys were down, respectively, when the key was pressed. There are also variables that say where (“srcElement”) and when (“timeStamp”) the event occurred. The variable we’re interested in however, is “keyCode”. All keyboard keys are assigned unique numeric values. In the example above, the value 32 represents the space key. Change your console.log to print the code of the key that was pressed then experiment with what codes are generated for different keys:

|
console.log("key down: " + event.keyCode); |
10. For any key that we plan to use in a game, it’s best practice to define a constant with a readable name rather than clutter our code with meaningless numbers that we have to look up every time. For this lab, we’ll be using some arrow keys and the spacebar. Add these constants to the top of your file:
 |
//keyboard constants |
We defined them in global scope (outside of any function) so that all functions can reference them. You can name the constants whatever you’d like in games you make, so long as they make sense. In a larger game you might even allow for the player to customize keys. To do this you could define a variable (not a constant, since it would change) named PLAYER_JUMP, for instance, and assign it to a default value that the player could change to a different key if desired. Then your code would look to see if the “PLAYER_JUMP” key was pressed to trigger the player to jump.
11. Now that we can make sense of what keys are being pressed, we should notify the rest of our game that a certain key was pressed so that the game logic can act on it. To do this, declare an empty array (again, in global scope) that will hold the state of which keys are pressed:

|
var keyIsDown= []; |
12. If you’re not familiar with arrays, they act like lists of objects that can be looked up by an index (typically the first element is index #0). In our case here, the index will be the key code and the object will be a true or false value of whether or not the associated key is currently pressed. If a true/false value has not been assigned to an index, the default value is considered undefined. Add the following line to the “keydown” event handler function so we can know when a key has been pressed:
 |
keyIsDown[event.keyCode]=true; |
13. We don’t want the key to remain permanently pressed, so we need to add a second event listener for when the key is released. The logic for “keyup” is similar to “keydown”, only in this case we want to delete our keyPressList entry from the list. This will revert the value back to undefined:
 |
theCanvas.addEventListener("keyup", |
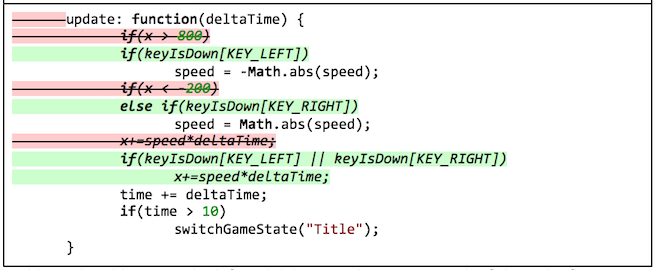
14. Let’s now test our key events in action. Change your update functions in your two states to look for if the left or right arrow keys are being held down and only update the angle or position accordingly:
 |
if(keyIsDown[KEY_LEFT]) |
 |
if(keyIsDown[KEY_LEFT]) |
You should now be able to use the left and right arrow keys to rotate the fish on the first screen and move the fish left and right on the second.
15. Let’s extend this by having the spacebar control when we switch states:
 |
if(keyIsDown[KEY_SPACE]) |
 |
if(keyIsDown[KEY_SPACE]) |
When you press the spacebar, the scene should change, but unfortunately, since you hold the spacebar down for more than 1/60 of a second (the duration of a single frame), the scene repeatedly jumps back and forth while the spacebar is pressed, despite how briefly you press it.
16. To address this issue, we’ll need to not check for if the key is currently pressed, but if it was just released. Modify your control handlers so that we track not only the current state of a key but also if it has been pressed on this frame:
 |
var key = { |
 |
key.isDown[event.keyCode]=true; |
 |
delete key.isDown[event.keyCode]; |
NOTE: the brace “{“/”}” notation on the variable “key” is used to denote an object with properties that are assigned using the colon, similar to what we’ve done for the game states. To refer to a property of an object, use the notation “object.property”.
Also reset the “wasPressed” property at the end of every frame so that it doesn’t stay stuck in the true position:
 |
key.wasPressed = []; |
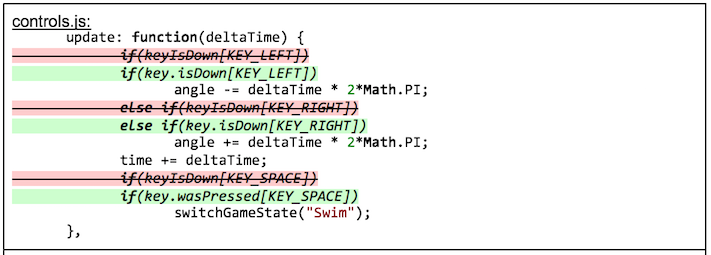
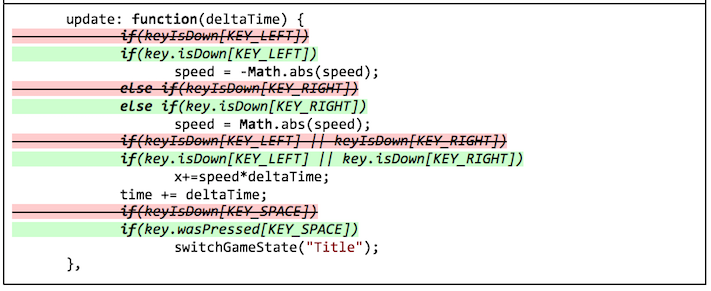
17. Next, update your state code to use the new event variable names (key.isDown for a continual action and key.wasPressed for a single event):
 |
if(key.isDown[KEY_LEFT]) |
 |
if(key.isDown[KEY_LEFT]) |
Your fish should now rotate and swim as before using the left and right arrow keys, but now when you press and release the spacebar it should switch scenes.
18. Now that our keyboard events are implemented, let’s move on to mouse inputs. The main events that we’ll use for mouse inputs are: “mousedown”, “mouseup”, and “mousemove”. We’ll start with these fundamentals then at the end add support for a few other related listeners, such as input from a touchscreen instead of a mouse.
19. The structure for mouse presses and releases will be similar to that of keyboard presses and releases. Begin by adding a variable that will keep track of the mouse cursor’s button, including the current pressed state of the button and if the button was pressed and released:
 |
var cursor = { |
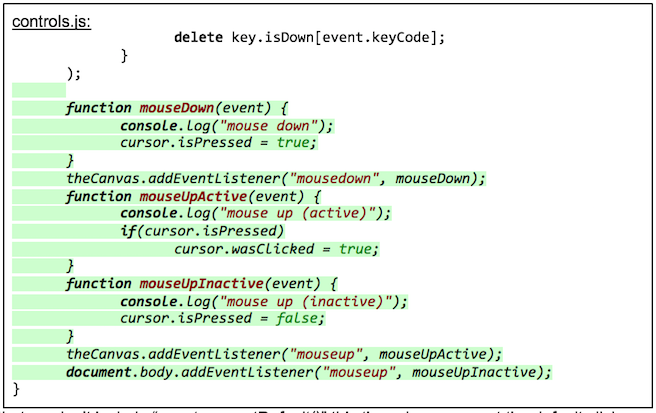
20. Next add functions that will handle mouse presses and releases, again similar to keyboard events. Declare them as independent functions instead of part of the “addEventListener” calls so we can later reuse them for handling touch events.
 |
function mouseDown(event) { |
NOTE: We don’t include “event.preventDefault()” this time since we want the default click action to still occur; that is, we want the canvas to gain or lose focus still on clicking. We also do a similar separation of mouse up events to active/inactive so that click events work as expected when dragging the mouse in and out of the canvas region (similar to the logic we did for key release events).
Also add the reset logic to the click like we did for the key release:
 |
cursor.wasClicked = false; |
21. Test your click functionality by making the states change on spacebar or mouse click:
 |
if(key.wasPressed[KEY_SPACE] || cursor.wasClicked) |
 |
if(key.wasPressed[KEY_SPACE] || cursor.wasClicked) |
You should now be able to click to switch between states.